162 lines
10 KiB
Markdown
162 lines
10 KiB
Markdown
---
|
||
{
|
||
title: "从debian装模拟器打Arknights到RK3568内核重编译",
|
||
description: "文章记录了Debian 11升级12的过程,重点警告:使用systemd时切勿升级或应卸载sysv-rc-conf,否则会引发冲突甚至删除systemd。升级前务必用timeshift备份,并注意处理dbgsym包及依赖问题。",
|
||
draft: false,
|
||
type: "article",
|
||
created_at: "2024-07-28T02:00:00+08:00",
|
||
published_at: "2024-07-28T02:47:00+08:00",
|
||
updated_at: [ "2024-07-28T02:47:00+08:00"],
|
||
category: '个人',
|
||
tags: [ "Linux" ],
|
||
tech_stack: [ "Docker", "Linux" ],
|
||
tech_stack_percent: [ 4,6 ],
|
||
tech_stack_icon_names: [ "mdi:docker", "simple-icons:linux" ],
|
||
tech_stack_theme_colors: [ "#1c90ed","#263238" ],
|
||
}
|
||
---
|
||
!!!warning Legacy Article 过时的文章
|
||
此文章从旧博客迁移而来,编写时技术水平有限,仅供参考
|
||
!!!
|
||
|
||
## 前言
|
||
写这篇文章的起因是想在RK3568上运行Arknights+MAA,但是模拟器需要的编译参数没有打开。故重编译内核。考虑到后续需要OpenWRT,故同时启用KVM支持。
|
||
在编译过程中,遇到了非常多的问题,在此记录一下。
|
||
### 前言就是用来写废话的!!(暴论)
|
||
这次编译内核就目前为止失败了三次。两次是因为磁盘空间不足,一次是因为内存空间不足。我会在之后成功时计算内存和存储的用量。(是的我是边做边写的,如果我做完再写就写不出这些废话了)
|
||
用到的RK3568是正点原子的,它们提供了一个Linux SDK包,并且给了一份指导书,可惜有一些缺漏。SDK包会有一些传统内核编译没有的东西(build.sh)(大概)所以这个教程并不一定能完全适用所有RK3568。请自行判断。
|
||
原子科技的内核编译使用的是VMware。我能理解,但我这里用的是WSL+Docker,因为我希望能最多的利用性能。
|
||
wsl的内存一定要拉大,还有SWAP,一定要拉大,我后续会出一份内存使用情况-时间图。(大概)
|
||
指导手册和源码指北:
|
||
[我是链接](http://www.openedv.com/docs/boards/arm-linux/RK3568Linux.html)
|
||
手册在A盘->10、用户手册.zip->10、用户手册->03、辅助文档->24【正点原子】ATK-DLRK3568_Linux5.10_SDK编译说明V1.0.pdf
|
||
源码在B盘->02、ATK-DLRK3568开发板SDK->05、linux5.10_sdk
|
||
## 正文
|
||
### Docker迁移
|
||
Windows的Docker Desktop wsl虚拟机默认装载C盘。你可能装在了别的盘,请确认该盘至少有91G容量。(粗略计算,建议多准备一些)(如果过程中内存不足,是会把整个wsl带崩的,到时候就只能`wsl --shutdown`重启wsl了)
|
||
Docker迁移非常简单Docker Desktop - Settings - Resources 然后直接改location就行。如果说你的Docker用过一段时间了,那么可能会很耗时。你可以通过任务管理器的磁盘占用与速率推断出Docker迁移是否完成。不要以Docker Engine是否重新启动作为参照。
|
||
我不建议你用wsl的导出和导入迁移Docker。虽然迁移后能用,但这会导致Docker内部显示的路径还是之前的路径,可能有影响?反正不太好。
|
||
### Ubuntu Container的启动与SDK全编译
|
||
在Docker中启动一个最小Ubuntu镜像。笔者使用的是22.04,但现在最新的应该是24.04了,所以注意一下latest tag对应的版本问题。这一步pull image即可。
|
||
镜像启动容器,这里我先用Docker Desktop创建一个有公共空间的镜像,然后再点击三个点 Copy Docker Run 把复制出来的命令中,加上-t --privileged。然后删掉容器,在powershell中重新运行即可。
|
||
这里给出我自己的Run命令:
|
||
```
|
||
docker run --hostname=4417a56bb7d1 --mac-address=02:42:ac:11:00:02 --env=PATH=/usr/local/sbin:/usr/local/bin:/usr/sbin:/usr/bin:/sbin:/bin --volume=C:\Users\{替换成你的用户名}\Desktop\dockerShare:/data:rw --restart=no --label='org.opencontainers.image.ref.name=ubuntu' --label='org.opencontainers.image.version=22.04' --runtime=runc -t -d --privileged ubuntu:latest
|
||
```
|
||
|
||
该命令把桌面上的dockerShare文件夹映射到Ubuntu内部的/data文件夹,你也可以改改。
|
||
Ubuntu镜像换源
|
||
tip:有bash,不要用sh折磨自己
|
||
这里给出我自己在用的源(阿里云),但是不能保证你用的时候源还能用:
|
||
因为没有vi,没有vim,没有nano,所以直接重定向即可。
|
||
```
|
||
echo "deb http://mirrors.aliyun.com/ubuntu/ jammy main restricted universe multiverse
|
||
deb-src http://mirrors.aliyun.com/ubuntu/ jammy main restricted universe multiverse
|
||
deb http://mirrors.aliyun.com/ubuntu/ jammy-security main restricted universe multiverse
|
||
deb-src http://mirrors.aliyun.com/ubuntu/ jammy-security main restricted universe multiverse
|
||
deb http://mirrors.aliyun.com/ubuntu/ jammy-updates main restricted universe multiverse
|
||
deb-src http://mirrors.aliyun.com/ubuntu/ jammy-updates main restricted universe multiverse
|
||
deb http://mirrors.aliyun.com/ubuntu/ jammy-proposed main restricted universe multiverse
|
||
deb-src http://mirrors.aliyun.com/ubuntu/ jammy-proposed main restricted universe multiverse
|
||
deb http://mirrors.aliyun.com/ubuntu/ jammy-backports main restricted universe multiverse
|
||
deb-src http://mirrors.aliyun.com/ubuntu/ jammy-backports main restricted universe multiverse" >/etc/apt/sources.list
|
||
```
|
||
更新&安装依赖
|
||
`apt update && apt upgrade`
|
||
|
||
代码更新需要python2.7(因为要装python2.7,我才不用自己的实体Ubuntu(原因一))
|
||
`apt install python2.7`
|
||
|
||
指导手册给的依赖 (好多我自己用不到的,我才不用自己的实体Ubuntu(原因二))
|
||
```
|
||
apt install git ssh make gcc libssl-dev liblz4-tool expect expect-dev g++ patchelf chrpath gawk texinfo chrpath diffstat binfmt-support qemu-user-static live-build bison flex fakeroot cmake gcc-multilib g++-multilib unzip device-tree-compiler ncurses-dev bzip2 expat gpgv2 cpp-aarch64-linux-gnu libgmp-dev libmpc-dev bc
|
||
```
|
||
因为使用了最小Ubuntu,所以需要额外装一些软件(vim是我个人的习惯,应该可以换nano?):
|
||
`apt install time file rsync bsdmainutils xz-utils vim`
|
||
|
||
为python2.7做一个到python的链接
|
||
`ln -s $(which python2.7) /usr/bin/python`
|
||
|
||
把显示转换为中文UTF-8,不换可能导致某些带中文的文件在vim中显示不正确
|
||
`echo 'LANG="zh_CN.UTF-8"' >> /etc/environment`
|
||
|
||
首先解压05、linux5.10_sdk.zip和其嵌套的文件夹,假设该zip已经在Ubuntu:/data文件夹下:
|
||
我不记得unzip是不是自带的了,我估计不是,如果没有就装一下
|
||
`unzip 05、linux5.10_sdk.zip` //此处建议敲个05,敲个tab
|
||
//把解压出来的两个tgz文件复制一份到主目录,如果缺空间,data下解压出来的tgz文件就可以删了。
|
||
```
|
||
mkdir ~/rk3568_linux5.10_sdk
|
||
tar -xzf ~/atk-rk3568_linux5.10_release_v1.1_20240705.tgz -C ~/rk3568_linux5.10_sdk
|
||
cd ~/rk3568_linux5.10_sdk
|
||
.repo/repo/repo sync -l -j10 //这一步用到了python (python2.7)
|
||
tar -xf ~/dl.tgz -C ./buildroot/
|
||
./build.sh alientek_rk3568_defconfig
|
||
```
|
||
准备工作都做完了,如果你只想编译内核,请跳转到下一节,如果你想全编译SDK就继续。
|
||
全编译:
|
||
`./build.sh all`
|
||
|
||
### 内核编译选项设置
|
||
由于后续使用Docker Desktop的terminal看不清选项菜单中的*,故使用其他terminal操作
|
||
` docker exec -it {docker id} /bin/sh`
|
||
进入内核文件夹
|
||
`cd kernel`
|
||
首先需要选择合适的defconfig 观察build.sh 编译kernel时的log
|
||
```
|
||
==========================================
|
||
Start building kernel
|
||
==========================================
|
||
+ make -C /root/rk3568_linux5.10_sdk/kernel/ -j21 CROSS_COMPILE=/root/rk3568_linux5.10_sdk/prebuilts/gcc/
|
||
linux-x86/aarch64/gcc-arm-10.3-2021.07-x86_64-aarch64-none-linux-gnu/bin/aarch64-none-linux-gnu-
|
||
ARCH=arm64 rockchip_linux_defconfig
|
||
```
|
||
可见defconfig名字为rockchip_linux_defconfig
|
||
删除之前生成的.config
|
||
`rm .config`
|
||
设置内核选项:
|
||
`make menuconfig KCONFIG_CONFIG=arch/arm64/configs/rockchip_linux_defconfig ARCH=arm64`
|
||
需要设置的内核编译选项有KVM和CONFIG_KPROBE_EVENTS
|
||
KVM比较简单
|
||
主页 Virtualization 按y勾选,然后回车进入,按y勾选KVM即可
|
||
CONFIG_KPROBE_EVENTS相对复杂一点,先搜索该选项。
|
||
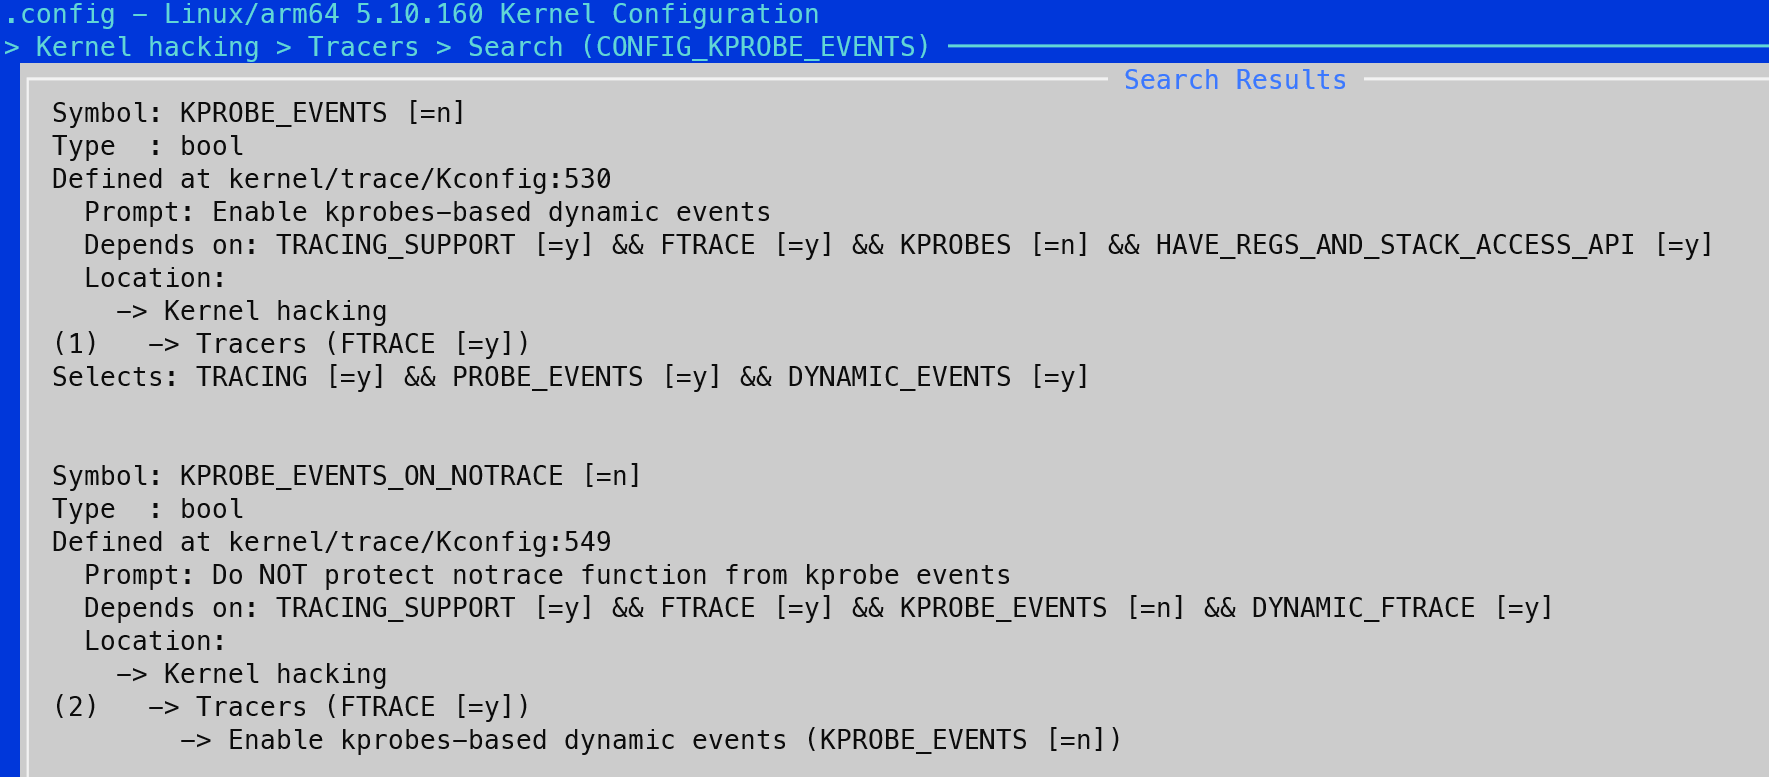
|
||
Location代表该选项位置,Depends on代表依赖。需要先满足依赖,该选项才会出现。(DFS启动!)
|
||
可见KPROBES为n,再次搜索KPROBES
|
||
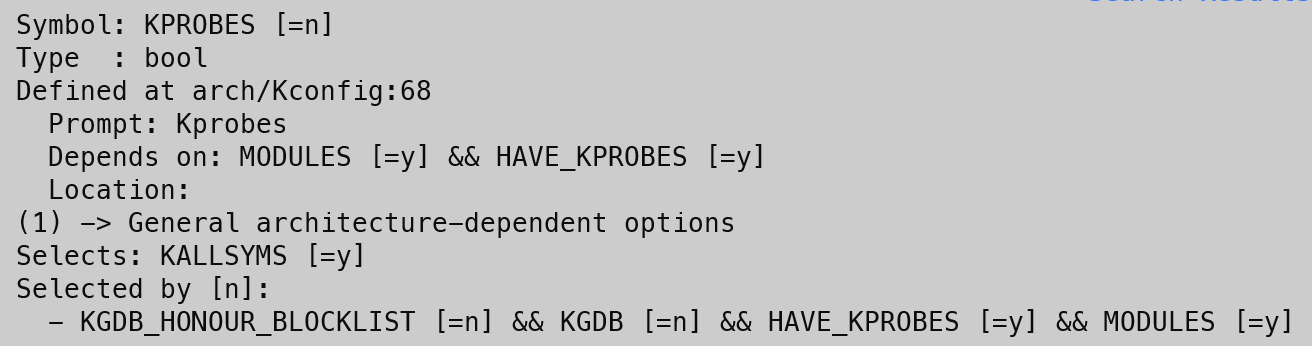
|
||
可见其Location为General architecture-dependent options 但是找不到这个位置
|
||
在经过我一顿尝试后,发现把KGDB打开就行
|
||
KGDB位置:Kernel hacking > Generic Kernel Debugging Instruments
|
||
之后CONFIG_KPROBE_EVENTS也自动开启了
|
||
选择save,之后退出
|
||
需要小小的修改一下源码,当然你也可以试试直接编译,但应该会遇到如下问题:
|
||
error: implicit declaration of function 'sve_cond_update_zcr_vq' [-Werror=implicit-function-declaration]
|
||
修改这个 kernel文件夹下
|
||
`vim arch/arm64/include/asm/fpsimd.h`
|
||
在170行添加这句话
|
||
tips: `:set nu`显示行号 `:170`转到170行
|
||
```
|
||
168 static inline void sve_user_disable(void) { BUILD_BUG(); }
|
||
169 static inline void sve_user_enable(void) { BUILD_BUG(); }
|
||
170 + #define sve_cond_update_zcr_vq(val, reg)
|
||
171 static inline void sve_init_vq_map(void) { }
|
||
172 static inline void sve_update_vq_map(void) { }
|
||
```
|
||
如果你需要启用KPROBE_ON_FTRACE,那你需要这个[链接](https://patchwork.kernel.org/project/linux-arm-kernel/patch/20191218140622.57bbaca5@xhacker.debian/#23074137)
|
||
此外,如果你需要启用DOCKER,那么我建议你同时启用NF_TABLE、BRIDGE、MASQUERADE、addrtype相关选项
|
||
重编译内核,打包镜像:
|
||
```
|
||
cd ..
|
||
./build.sh kernel
|
||
//updateimg不是必要的,其作用是更新update.img,如果你只烧录内核,那你可以在output/firmware/找到它
|
||
./build.sh updateimg
|
||
```
|
||
kernel位置:
|
||
boot.img: output/update/Image/ 同output/firmware/
|
||
update.img: output/update/
|
||
### 引用:
|
||
[Kprobes介绍](https://www.kernel.org/doc/html/latest/trace/kprobes.html)
|
||
[sve_cond_update_zcr_vq 相关错误与解决方案](https://mailweb.openeuler.org/hyperkitty/list/linuxarm@openeuler.org/thread/3D6J3RU6ZDFIINBJG7T4OETLERMXMWOB/#:~:text=The%20root%20cause%20is%20that%20sve_cond_update_zcr_vq%20is%20not,it%20by%20adding%20an%20empty%20definition%20when%20CONFIG_ARM64_SVE%3Dn.)
|
||
[ARM64启用KPROBE_ON_FTRACE的PATCH](https://patchwork.kernel.org/project/linux-arm-kernel/patch/20191218140622.57bbaca5@xhacker.debian/#23074137)
|
||
### 待补充内存图
|
||
内存图鸽了,我不想再折磨一次电脑,目测RAM占用上过10G,我用的16G内存加16GSWAP,在用户文件夹下的.wslconfig调整
|